I get asked fairly often about adding names to designs so I thought I would take a minute to show you how to add a name to an applique design. For this example, we are using our Pumpkin Design, Embird Editor, and a purchased embroidery font.
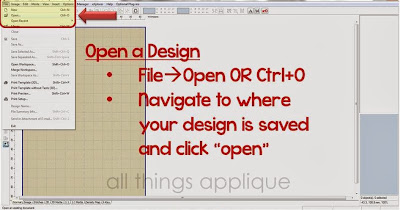
The first step is to open Embird Editor and load a design. In the screenshots below I have tried to draw a box around the area of the screen I am talking about as well as mark it with an arrow. So if you don't know what I am talking about, look for the boxes/arrows! To open a design, Click on File, then Open or use the Keyboard Shortcut "Ctrl+O".

To add text to this design, we need to "Merge" the font designs with the Pumpkin Design. To do this, click on File, then Merge or use the Keyboard Shortcut "Ctrl+M". Once the Merge box opens, navigate to where you have the font designs saved on your computer.
The first step is to open Embird Editor and load a design. In the screenshots below I have tried to draw a box around the area of the screen I am talking about as well as mark it with an arrow. So if you don't know what I am talking about, look for the boxes/arrows! To open a design, Click on File, then Open or use the Keyboard Shortcut "Ctrl+O".

To add text to this design, we need to "Merge" the font designs with the Pumpkin Design. To do this, click on File, then Merge or use the Keyboard Shortcut "Ctrl+M". Once the Merge box opens, navigate to where you have the font designs saved on your computer.

You have the option of adding one letter at a time by clicking on the letter and then clicking "ok". Or, you can add all of the letters at one time by holding down the "Ctrl" key while you select each of the letters, then clicking "ok".
(Note: If you have a name with duplicate letters (example: Allison) you will need to "Copy & Paste" the "l" within the Object Orders Bar to create the second "l".)

You can see in the picture below that Embird did not magically spell out the name Emily and center it nicely in the middle of the pumpkin. Instead, it piled all of the letters on top of each other and put them in alphabetical order...NOT name order! But, we can fix that with a few clicks.

First, we need to reorder the letters from e-i-l-m-y to e-m-i-l-y. To do this, click on the "m" and drag it to just under the "e". When you do this, a pop up box appears that asks you where you want to put the "m". In this case, we want to choose "Insert Before Object" option. If you don't get it right the first time...just click and drag again and try a different option. You will need to keep doing this until your name reads correctly from top to bottom. This will ensure that the name stitches from left to right as opposed to stitching the "e" then the "i", then back to the "m" and so on. You want to have the jump stitches be next to each other so you have less trimming and so those jump stitches don't get in the way of the other letters stitching properly.
Our first Alignment is going to space all the letters in the word "Emily" evenly from where you set the "e" to where you set the "y". This is why is it important to take the time to set the first and last letters strategically. We are also going to align all of the letters so they have the same bottom line. See the instructions on the picture below for specific steps.

The "emily" below is looking better, but the "y" looks funny now that it is too high. The horizontal spacing looks great. Let's fix that "y".

This next step is important. I want the "y" to drop down so the top of the "y" is even with the top of the "m". You must click on the stationary letter first. In this case, click the "m", then hold down your "Ctrl" key and click the "y". Use the keyboard shortcut "Ctrl+G" to open the alignment box and choose to align Vertical by Tops.

Now the "emily" looks just right. It is aligned horizontally and vertically. Now...you are welcome to click on each letter and nudge with arrows or with your mouse until you get the letters how you want...but I think the "Alignment" box is a great tool that is quick and extremely accurate. Much better than my nudging. :)
The final step is to "join" the designs and save! Select all six objects in the Objects Order Bar and click on the "Join" icon.

The final step is to save as a new design. Select your machine format and click "OK"

Technically, it is a good practice to save as a new design at the very beginning so you do not save over the original design that you purchased. Be sure to give the file a unique name. I like to include the name that I merged so I can find it again later.

I hope you found this tutorial helpful. Please feel free to contact me at allthingsapplique (at) gmail (dot) com with any questions. Thanks for reading!


No comments:
Post a Comment