Monday, October 14, 2013

How to Add a Name to an Applique Design in Embird Editor

I get asked fairly often about adding names to designs so I thought I would take a minute to show you how to add a name to an applique design.  For this example, we are using our Pumpkin Design, Embird Editor, and a purchased embroidery font.

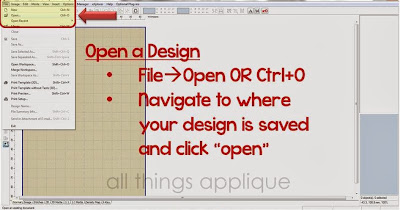
The first step is to open Embird Editor and load a design.  In the screenshots below I have tried to draw a box around the area of the screen I am talking about as well as mark it with an arrow.  So if you don't know what I am talking about, look for the boxes/arrows!  To open a design, Click on File, then Open or use the Keyboard Shortcut "Ctrl+O". 


To add text to this design, we need to "Merge" the font designs with the Pumpkin Design.  To do this, click on File, then Merge or use the Keyboard Shortcut "Ctrl+M".  Once the Merge box opens, navigate to where you have the font designs saved on your computer.   


You have the option of adding one letter at a time by clicking on the letter and then clicking "ok".  Or, you can add all of the letters at one time by holding down the "Ctrl" key while you select each of the letters, then clicking "ok". 
(Note: If you have a name with duplicate letters (example: Allison) you will need to "Copy & Paste" the "l" within the Object Orders Bar to create the second "l".)


You can see in the picture below that Embird did not magically spell out the name Emily and center it nicely in the middle of the pumpkin.  Instead, it piled all of the letters on top of each other and put them in alphabetical order...NOT name order!  But, we can fix that with a few clicks. 


First, we need to reorder the letters from e-i-l-m-y to e-m-i-l-y.  To do this, click on the "m" and drag it to just under the "e".  When you do this, a pop up box appears that asks you where you want to put the "m".  In this case, we want to choose "Insert Before Object" option.  If you don't get it right the first time...just click and drag again and try a different option.  You will need to keep doing this until your name reads correctly from top to bottom.  This will ensure that the name stitches from left to right as opposed to stitching the "e" then the "i", then back to the "m" and so on.  You want to have the jump stitches be next to each other so you have less trimming and so those jump stitches don't get in the way of the other letters stitching properly.
 
 
Now that our letters are in alphabetical order, it is time to spread them out and align them.  What I like to do is strategically place my first letter (e) and my last letter (y) where I want them on the pumpkin.  Notice I have them both equal distance from the middle.  You can use your guidelines to help with this.  Next you want to open your Alignment box.  You can do this 3 different ways: 1) click the Edit menu, then Align 2) use the Keyboard Shortcut Ctrl+G 3) click the Align button on the left hand toolbar (see the small highlighted box in the picture below).

Our first Alignment is going to space all the letters in the word "Emily" evenly from where you set the "e" to where you set the "y".  This is why is it important to take the time to set the first and last letters strategically.  We are also going to align all of the letters so they have the same bottom line.  See the instructions on the picture below for specific steps. 


The "emily" below is looking better, but the "y" looks funny now that it is too high.  The horizontal spacing looks great.  Let's fix that "y". 


This next step is important.  I want the "y" to drop down so the top of the "y" is even with the top of the "m".  You must click on the stationary letter first.  In this case, click the "m", then hold down your "Ctrl" key and click the "y".  Use the keyboard shortcut "Ctrl+G" to open the alignment box and choose to align Vertical by Tops.


Now the "emily" looks just right.  It is aligned horizontally and vertically.  Now...you are welcome to click on each letter and nudge with arrows or with your mouse until you get the letters how you want...but I think the "Alignment" box is a great tool that is quick and extremely accurate.  Much better than my nudging. :)

The final step is to "join" the designs and save!  Select all six objects in the Objects Order Bar and click on the "Join" icon. 


Notice how the six objects are now one object. 


The final step is to save as a new design.  Select your machine format and click "OK"


Technically, it is a good practice to save as a new design at the very beginning so you do not save over the original design that you purchased.  Be sure to give the file a unique name.  I like to include the name that I merged so I can find it again later.   


I hope you found this tutorial helpful.  Please feel free to contact me at allthingsapplique (at) gmail (dot) com with any questions.  Thanks for reading!


Friday, September 27, 2013

1 Shirt + 2 Pairs of Pants = ???

Want to know one of my favorite end of season clearance rack tricks?  I love to look for a cute pair of shorts/leggings/skirt/etc. in the size that will fit for the following season, and then I look for another pair of the exact same shorts/leggings/skirt/etc. in the largest size available!  Want to know why?  I cut up the larger pair and use the fabric to make a coordinating applique shirt.  Check out the cute Ghost Name Patch set I made below.

Ghost Patch Pants Tutorial-003

I started with a long sleeve black shirt and two pairs of striped leggings from Target.  My niece is currently wearing size 18 mo. but I also bought a size 4T in the leggings as well. 

Ghost Patch Pants Tutorial
I decided to cut in the back bottom area first - this is where the fabric is the largest in between seams.

Ghost Patch Pants Tutorial-001

Because this is a stretchy knit material I wanted to be sure to use Heat-n-Bond Lite to secure my fabric while stitching.  Knit is notorious for rolling up and puckering...which can be nice for a raggy finish, but not when satin stitching is involved! 

Ghost Patch Pants Tutorial-002
 
I love having some of the pants pattern included in the top and now I am tempted to go buy a pair of 2T leggings for next year as I have enough fabric left from the 4T pants to make another cute shirt next year!

Here are some of my favorite spots to look for cute and affordable bottoms to purchase in duplicate: Old Navy, Target, Gymboree, Crazy 8.  Any other recommendations? 


Saturday, August 31, 2013

Shapes for Everyone!

Today is the first day of College Football 2013!  Can I get a War Eagle?  At least from some of you, right?   Whoever you cheer for there is one thing for sure...long football games are a perfect time to fit in some quick sewing projects.  And I have just the thing for you:  Raggy Shapes

Our Raggy Alphabets and Raggy Numbers have been super popular and now you can continue the education and fun with our brand new Raggy Shapes

DSC_0023

I was able to stitch all 14 shapes in under an hour and I even had "help" during the process from my five year old! He examined each shape very carefully as soon as it was completed. This is a great set of shapes because there are some familiar shapes that most kids will know (circle, triangle, square) but there are also some more challenging shapes (hexagon, octagon, crescent moon) which is a great teaching opportunity mixed in with fun!

May 20132-002

I decided to use solid colors of felt for this set of shapes which you can find for a quarter a sheet or less at most craft stores. You will receive a detailed pdf tutorial complete with photo illustrated step by step instructions.

There is so much you can do with our Raggy Alpha and Shapes...but one of our favorite activities this past week was Hide and Seek Shapes. I did the "hiding" the first time around and tried to keep it simple as they were still getting used to what all of the shapes looked like.

Products for Web29

We knew we hid 14 shapes so it was a good counting exercise to make sure we found all 14 hidden shapes. (I must admit...as the games progressed and the level of hiding difficulty increased we didn't always find all 14 right away!) Here is a pic of my boys on the hunt the first time!

Products for Web29-001

My five year old has started hiding by blending the shapes into an object of the same color. Our white pentagon was cleverly set on our white bookshelves but even though it was in plain site it was one of the last ones for me to find because it blended so well. Clever little guy!

And here is one more thought for your raggy shapes. I kept mine simple and plain, but you could also use your editing software to add a smiley face to your shapes or even add the names of the shapes and the numbers of sides to the tough shapes to help with the learning as well.

Products for Web31

We are really enjoying our shapes and I am thinking of making sets for my boys' preschool classes too!  How will you make yours?

DSC_0027-001

You can find our Raggy Shapes shapes here. (They are on sale through September 2, 2013.)

Tuesday, August 13, 2013

Tuesday Tip-Day: Change of (Fabric) Plans

Confession time.  How long does it take for you to pick your fabrics when stitching?  Does a fabric pop into your mind as soon as you look at the design?  Or do you put two, three, or ten fabric swatches on top of a blank item to try to help you decide which one to use?  I typically fall somewhere in the middle of those extremes but have been on either end at some point too!

Do any of you get through a design and then realize you should have used another fabric?  I have had those problems too...but I have also been able to fix that issue mid way through a design!  Want to know the trick? 

At All Things Applique, I typically create the designs so all of the placement and tackdown stitches are at the beginning of the design and all of the satin and detail stitching follows at the end of the design.  This can't be done all of the time, but I prefer to get all of my trimming done at the beginning and then let the time consuming satin stitches run at the end while I prep my next project.  When all of my tackdown and trimming steps are complete, I usually hold up my hooped item and take a good look to make sure I like what I see.  In the picture below, I thought the fabric on the left for the crown was too busy.  When I put my fabrics together ahead of time, I thought the stripes would look great against the orange pumpkin, but once the small crown piece was tacked down I knew it didn't look how I pictured.  Sigh.  Instead of starting over, I simply went back one thread color on my machine and tacked a new piece of crown fabric on top of the old crown fabric! 

Products for Web15


Here is the finished Princess Pumpkin with our Pirate Pumpkin...


Aren't they a cute pair?

A few extra tips:
  • make sure that the new fabric is dark enough to cover the first fabric.  If not, try putting a solid piece of fabric in between the old fabric and new fabric
  • make sure the first fabric is trimmed a close as possible before tacking down the second fabric
  • in the example above, if you want to change any "bottom" fabrics (such as the pumpkin), you will also need to re-tack the top fabric. 
  • I would only recommend doing this once.  The more fabric layers you add, the tougher it will be for the satin stitches to cover all of the edges. 
Hope this Tuesday Tip helps you work through any fabric change of plans with ease! 

Friday, August 9, 2013

A New Kind of Busy Season

Several years ago the term “busy season” caused an increased level of anxiety for me.  It meant extremely long work hours and lots of tight deadlines.    Can you guess my old profession? 

Tax Accountant.  I worked at one of the Big 4 firms in Atlanta for several years after graduating college and worked on many a tax return.  January 1 to April 15 every year was crazy busy and stressful and I think I ate more dinners at the office than at home.  And as typical accountants, we had a very efficient spreadsheet that was circulated every afternoon to place an order if you were working late.  Ha!  But somehow we always survived and met all of our deadlines.  Phew! 
Now, I have a different busy season.  It involves apples, footballs, and pumpkins.  It gets me excited and makes me want to sketch and think of different fabric and stitch combinations.   I feel like the “to do” list is longer than there are hours in a day, reminiscent of past busy seasons.  Still, every morning I am ready to tackle one or more items on that list!  With Back to School, Football, and Fall right around the corner it is busy season for sure…but in a good way. 

Over the past few weeks, I have released a mini set of Football Designs

 Back to School Designs


And now I am about to do it all over again!  Today I am working on one more set of back-to-school designs including some more “sketch” designs as well as some preschool patches, a fun back-to-school dino and some raggy shape designs.   

Have an idea for my next set of Football or Fall designs?  Please leave a comment below!  If I use your idea you will receive that design for FREE!

Wednesday, July 24, 2013

Feeling a Little Sketchy...

I am all too aware that summer is flying by and it will be time to send the kiddos off to school again before we know it.  As I was thinking about what types of  "back to school" designs to offer this year, I became inspired by some rough sketches.  What is more "back to school" than designs that resemble the beginning stages of our little ones being able to express themselves with art! These designs are NOT created with straight lines. Instead I created imperfect lines on purpose that give these designs a whimsical yet accurate feel.  

Check out our Triple Crayon Sketch design below.   It is offered as both a Bean Stitch Applique design and an Embroidery only design. 

Triple Crayon Sketch Applique

The Bean Stitch Applique design is on the right. I love this design because it is quick to stitch and you can even use ONE thread color! How is that for easy? The raglan shirt example only uses white thread. Let the solid color fabrics do the talking and the white contrast thread makes the crayons pop! However, if you would prefer to change thread color but not cut fabric, I have a solution for you too! Look at the Embroidery only design on the left. There is no fabric to cut. Simply hoop your shirt or backpack, thread your favorite colors and stitch away. I love the look of the alternating colored letters on top of these crayons. You could also add the name on the side or even rotate the crayons sideways and add a name horizontally on top. So many options...what will YOU create?

My little boys are in a color groove right now. One likes EVERYTHING blue. The other EVERYTHING green. And when I say everything, I mean blue forks, blue cups, blue shirts, etc. If there is a choice and one item has blue (or green)...that will be the winner! I am tempted to make something for them with every crayon the same color! I think they would LOVE it.

For those of you that enjoy all the colors of the rainbow...check out our ROY G. BIV design. Do you know ROY G. BIV? He is a colorful man, isn't he?

Products for Web26

And finally, here is our brand new Art Palette design. This design also comes in Bean Stitch and Embroidery only. The color names stitch last and can easily be skipped as seen in the raglan tee example.

Products for Web25

Next up, I have scissors, a school bus, a pencil, and possibly a school house in the works. I hope you enjoy these "sketchy" designs as much as I do. I think they feel fresh and I hope you enjoy the uniqueness of these designs.

Sunday, May 19, 2013

Teacher T-H-A-N-K Y-O-U Gift

The school year is coming to a close which means it is time to tell our teachers how much we appreciate them!  I like to involve my boys whenever possible so I decided to modify a cute Christmas card we received last year.  The card said "PEACE" but it was spelled out with 5 pictures of the kids holding the individual letters P-E-A-C-E.  Simple but so cute.

To make our Thank You cards, I started with construction paper and sketched the letters in a bold black marker.  I set the boys up at the table with markers and stickers and told them to decorate the letters however they wanted...  (this was a school morning...they were ready...but I was not...so this was a great "busy" activity while I got my act together!)

All Things Applique Blog

Once the letters were done...we went outside to our front porch and I took pictures of the boys holding their letters in front of a neutral background. I loaded them into Picasa (a FREE photo editing software) and did some cropping/straightening/lighting adjustments. The final step was to pick my favorite of each letter and create a collage (also using Picasa). I ordered some 5X7 cards from Walgreens (using a great coupon) and picked them up the next morning.

  All Things Applique Blog

I think they were a big hit...and we just might use them again for my boys' joint birthday party later this summer!

We also gave our teachers new books for their classroom. I thought this would be something that gets used often and I wrote a note inside each book cover so the teachers would remember our kids when they read these books to their classes over the next years...

All Things Applique Blog

(in case you are wondering...the books from left to right are We Are in a Book (piggie and elephant...we LOVE these!), Yummy Yucky, Color Book, Put Me in a Zoo (Dr. Suess, of course!)).

The last "thank you" I did was for our preschool Director. She had given me some blank white capes several months ago and mentioned that she "heard" I could sew. Does that happen to any of you??? People find out about your little hobby and you get volunteered? I am not complaining...I was happy to do it...and my boys absolutely loved that I was able to do these for their classrooms. Just a part of the job I guess! :)

Anyhow...I decided to keep them somewhat gender neutral and simple by using our new Lightning Bolt and Star on Circle patches using different color felt. They were quick to sew but turned out really cute...and I hear the classrooms have lots of new superheros these days!

All Things Applique Blog

Do you have any teacher thank yous/crafts to share? If so, please link up in our comment section below and share your wonderful work!

Saturday, May 18, 2013

The Zig and the Zag on Chevron

Chevron is truly ALL the rage these days.  You can find chevron rugs, chevron aprons, chevron website templates, chevron mugs...and yes, chevron fabric!  I thought you guys might enjoy a few tips about the different types, where to find it, and how to best use it for all things applique. 

First, there are several sizes of chevron as well as colors. 

For most of my applique work, I prefer to work with the small chevron.  Remember, the larger the chevron, the less often it repeats.  So, on smaller applique designs, the small chevron pattern will repeat more frequently and have more of an impact. 

All Things Applique Blog - Chevron

Here is the frequency of pattern repeat for each size:
Small: horizontal repeat = 1" vertical repeat = 1"
Medium: horizontal repeat = 2" vertical repeat = 2"
Large: horizontal repeat = 4" vertical repeat = 4"
(pictures and measurements are from Riley Blake)

After deciding on the size...you have the tough choice of picking what color you want.  I'll take one of each, please.  Most of the basic colors come in an alternating white chevron pattern or a tone on tone chevron pattern.  Both of these can make your applique design feel different.  I think the tone on tone is a little more subdued...where the white chevron make more of a bold statement.  Again...both are great and I will still take one of each.  Ha!

All Things Applique Blog - Chevron

But don't settle for just the basic colors of the rainbow...there are now multi-color chevrons!  Check out the picture below for just a few examples.  I know I will be using the Halloween and Christmas chevron in some of my fall designs...and they have lots of color combos perfect for football season!  Any Auburn/Alabama divided houses out there?  Check out the orange/blue/crimson/grey chevron!  Perfect. 

All Things Applique Blog - Chevron

Have you made your wish list yet?  Good...now let's get shopping. 

I am going to share a handful of places to buy chevron.  But...before I go on...please understand this is a very small list...there are LOTS of places to get your hands on this super fun fabric.  But, if you hit a wall and just can't find it anywhere...I hope some of these links will help.

My first stop is usually Etsy.  I just typed in "chevron fabric fat quarter" and got 1713 results.  That should keep me stocked for while, don't you think?  I have ordered from Half Stitched before and received my fabric very fast!  I have also been impressed with the selection at The Fabric Shoppe.
But again, there are so many out there...so just have fun looking...mark a few as your favorite...then make a decision.  I have always enjoyed my Etsy experience...but be sure to check a seller's feedback before ordering. 

All Things Applique Blog - Chevron

Next up...fabric/quilting stores.  Being able to shop in person is wonderful...but the next best thing is a great online store!  Here are a few of my go-to online fabric shops:

* TJ Fabrics: they have a lot of assorted fat quarter bundles perfect for applique!
* The Smockingbird: this shop is in my hometown and I always try to stop in and say hello when I am in town...and 9 times out of 10 I leave with a bag of new fabric!  They have chevron and also have a great selection of auburn/alabama prints come football season.
* The Sewing Room: I visited this store for the first time last fall and stocked up on chevron...and got matching embroidery thread at the same time! 

All of the above are in Alabama...which is where I grew up so I guess I am biased...but I do think they are great fabric/sewing resources! 

And here are some of our recent designs that I tested using chevron fabric. It's bold...it's fun...and it's in!
 
All Things Applique Blog - Chevron

What will you make with chevron?
Do you have a great chevron resource? Please share in the comments below! 

Sunday, March 17, 2013

Adding Extra Fabric or Stabilizer

Top o' the morning to you this fine St. Patty's Day morning. 

We had absolutely gorgeous weather yesterday which meant we were outside basically from sun up to sun down...which meant I did not accomplish my three blogs in three days goal. (sigh)  But we were able to watch my 4 year old's soccer game, start our seeds for our garden, do a little landscaping, and take in an afternoon baseball game so all in all it was a wonderful day.  They are calling for possibly more snow next weekend (or a very cold rain) so I am glad we got outside while we could!

During a couple of recent stitch-outs I decided to add some extra fabric/stabilizer in the middle of the process to ensure a great finished product. I had just finished stitching our Zig Zag Bunny on a shirt and everything was going as planned.  Just before I started stitching the name above the bunny, I checked the number of stitches left on the design.  It seemed to me that the font I was using was extra dense (lots o' stitches) so I decided to add a layer of tear-away stabilizer under the hoop to make sure the dense letters did not cause the shirt to pucker. 


Adding Extra Fabric or Stabilizer

Once the design was finished stitching I just tore away the extra stabilizer. No puckering.  Perfect!

Zig Zag Bunny Shirt - All Things Applique

On our Scallop Bunny Patch design I used a very bold chevron pattern for bottom fabric (the scallop applique) and a solid light pink fabric for the top applique (bunny). As I was placing the light pink fabric on top of the chevron fabric I noticed I could still see the chevron lines through the pink fabric. I decided to add a layer of while flannel in between the light pink fabric and chevron fabric to ensure no chevron lines would show through.

Adding Extra Fabric or Stabilizer-001

When you have multiple layers of fabric for one applique layer I recommend cutting as close as possible to ensure the satin stitches cover everything.  If you don't have white flannel, you could also try a second layer of the solid pink fabric (or whatever fabric you are using) or a white cotton, etc.  I just had the flannel handy and it worked for me. 

Here is the finished product...success!

Bunny-Scallop-Patch

So, don't be afraid to modify your process mid-way to achieve the finished product you are hoping for.   A little extra stabilizer or another layer of fabric can make all the difference!

Friday, March 15, 2013

Adding a Patch to Cover a Monogram

My sister-n-law was given a super cute hand-me-down dress with matching bloomers. The only catch was that there was an "m" monogram on the dress...and her daughter's name starts with a "c". So she asked me if we could make it work and I said of course! Here are the steps I did to make this adorable and FREE dress work for her.

First, here is a picture of the dress with most of the "m" still in tact. I got a little excited and started ripping out stitches before I took a picture. 

Patch to Cover Monogram - All Things Applique

And here is a close-up of the process of pulling out the stitches. I decided to cover the "m" with a green circle patch to compliment the pink polka dots on the dress and to match the green rick rack trim. I could have left the "m" alone, but the stitches were pretty dense and therefore raised and I thought you would be able to feel/see the "m" underneath the patch so I decided removing as much of the "m" as possible was the best strategy.

Patch to Cover Monogram - All Things Applique-001

To do this, I used both my applique scissors and a seam ripper and tried to cut through the bottom stitches. Once you cut through the bottom stitches, the top stitches are relatively easy to pull out. I was able to remove all of the top satin stitches. The bottom underlay zig zag stitches were very tough to cut out. But they were also pretty flat so I decided to leave them alone.

The next decision was what size Circle Patch to use to cover the "m". Because the "m" was so close to the top, I knew I was going to need a circle that was wider than the width of the "m" because the top of the circle would be covering the "m" instead of the middle of the circle where the width is the widest. Are you still with me?

Patch to Cover Monogram - All Things Applique-002

I opened a Word document and created 3 circles of varying sizes, printed the circles, and cut them out. Then I placed each of the circles on the "m" to see the smallest circle that would fully cover the "m" but still leave a little bit of room between the top of the circle and the top of the dress.

Patch to Cover Monogram - All Things Applique-003

Four inches was the magic number. I pinned this to the dress exactly where I wanted the circle to stitch and then got my hoop ready for stitching. I decided to only hoop the stabilizer. I used a medium tearaway (I think...it might have been cutaway) and then I used spray adhesive to position the dress where I wanted it.

The next step was crucial to getting the right placement. Once everything was hooped and ready to go...I loaded the circle patch design on my machine and used the layout buttons to move my design on the hoop so it would stitch exactly where I wanted it to.

Patch to Cover Monogram - All Things Applique-004

I thought positioning the top center needle position would be easiest. I then used my arrow buttons to move the needle until it was exactly on the edge of the circle that I had pinned in place.

Patch to Cover Monogram - All Things Applique-005

I even lowered my needle to double check that it was lined up. I checked the bottom, right, and left boundaries as well. Once I was pleased with the location, I removed my cut out circle template and stitched my first placement line for the circle patch.

Patch to Cover Monogram - All Things Applique-006

You can see in this picture how the "m" is mostly covered by the top of the circle patch but there is still room to see some of the dress in between the circle patch and the top of the dress. Mission accomplished. :)

The green fabric I used for the patch was pretty thin and I was afraid you would still be able to feel part of the underlay stitches of the "m" so I tacked down a layer of flannel before I tacked down my green fabric layer.

After the circle patch finished...I stitched the monogram in a pink thread to match the polka dots.

Patch to Cover Monogram - All Things Applique-007

And there you have it...a personalized hand-me-down dressed re-worked for another sweet girl.

Patch to Cover Monogram - All Things Applique-008

I hope this step by step blog helps you recreate something too!